Category: Android Tutorials

Financial Planning (Android)

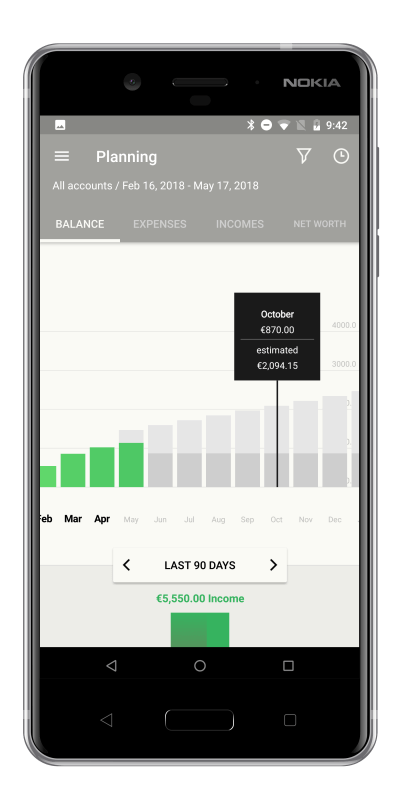
Learn from your past spending and earning patterns and prepare for the future. That’s what the Planning graphs are all about.

Switch between 4 tabs to monitor all main aspects of your personal finance:

  • Balance
  • Expenses
  • Incomes
  • Net Worth

and make use of detailed views, calculated averages and estimates for the future. Filter the display of your financial data by category, tag, account or location, and compare the incomes with expenses and budgets in the River flow graph.

This feature is available with Toshl Pro or Toshl Medici subscriptions.

Balance – monthly balance of incomes and expenses

This balance is shown separately for every month and is calculated as:

monthly incomes  monthly expenses = monthly balance

Staying in the positive, above the central line, is crucial. It might evade you sometime, but aim for it on a yearly average.

Expenses – spending per month

This section shows you the sum of expenses for each month, but can also be filtered to display spending for chosen categories, tags, locations and financial accounts.

Incomes – earnings per month

Display of the total sum of incomes each month can be further adjusted by filtering by categories, tags and financial accounts.

Net worth – total balance of your financial accounts

These funds accumulate if you have regular surpluses on your monthly balances. The amounts reflect the account balances at the end of the month.

Tap & hold for details and a lollipop

To get the exact value for each column, tap and hold somewhere on the graph.

A “lollipop” will pop up, displaying the exact value for that particular month.

Past months will also display averages for the last 12 months, while future months show the estimates for the chosen period.

River flow – see the financial flows each month

You’ll notice that the River flow graph is displayed below the multi-month graph. It shows how your incomes and expenses compare to each other and your budget in an individual month. If you have a monthly budget for all expenses, River flow will include it in the calculation as well. That way you’ll always know how much you can spend while staying within your budget limits.

Travel in time

12 months are shown on the graph – by default 6 past ones, the current month, as well as 5 future months.

You can move through time by using the  < >  arrows under the graph, swipping left or right, or by using the general time span settings from the right sidebar.

If you’re interested in sums for a certain period, you can also select a custom time span. The selected months will be displayed in darker color below the graph and you’ll see sums for the entire period.

Filter by category, tag, account, location

You can zero-in on specific data you’re interested in and want to see over a longer period of time.

Let’s say you want to know how your spending on Food & Drinks varies in time. Tap on the Filter icon in the upper right corner, select “Expense categories” from the menu, then tap “SELECT” and choose “Food & Drinks”. Return to the graph by tapping the “back” arrow in the upper left corner. Your spending data is now filtered to only display the expenses for the Food & Drinks category, so you can see how it varies through the year.

You can narrow it down even further by selecting a tag. Do the same in the “Expense tags” section and you can see how much you spent only on restaurants, alcohol, groceries, or a combination of multiple tags.

You don’t have to pick only one filter. They can be combined. For example, you can set it to only show expenses paid with MasterCard (financial account), for Leisure (category), for books, movies and music (tags), in HMV Manchester Arndale (location).

The filtering is global, so it will work with all the data in your Toshl app. Any filter that’s applied will be displayed above the graph, and the excluded categories, tags, etc., will be written in strikethrough.

Estimates and planned expenses

You’ll notice that the future months on the graph aren’t as colorful. That doesn’t mean that the future isn’t bright, just a bit hazy for now.

The semi-transparent columns in future months can display your planned entries, future estimates or both.

Planned entries

These are the expenses, incomes and transfers you have already entered for the future, or were generated automatically based on the repeating entry settings that you have set for your finances. We advise to add as many of these as you can possibly predict. They will help you plan your future months and help you keep the financial stress down to a minimum.

These planned entries can be set to be displayed in your graph. You can adjust this by tapping the Time span icon in the upper right corner, selecting a month to review, and setting the switch for “Show planned expenses in graphs” to ON or OFF. This will also affect other graphs in Toshl.

Estimates

Estimates project your past trends in earning and spending into the future. This provides you with a rough guide of what to expect from your balances, spending, earnings and net worth in the upcoming months, if the current trends continue as they have so far.

Since the estimates are based on your past data, the more time you’ve been tracking your finances with Toshl, the more precise they can become. We will also continue improving the algorithm for this feature, so it will become better at estimating your spending patterns.

You can switch the “Include future estimates” option ON or OFF in the filtering menu, on the bottom of the page.

Toshl monster plays it smart and plans for the future. Join in!

Posted in Android Tutorials, Tutorials

Save Photos of Receipts and Invoices with Your Expenses (Android)

They say that a picture is worth a thousand words. Also, a bird in the hand is supposedly worth two in the bush. Now, we are not exactly sure how much a picture of a bush is worth to a bird, or what’s the current exchange rate for bushes to ounces of gold, but if you’re going to buy some, you might as well add a photo of the receipt next to your records of expenses in the Toshl app. It never hurts to have things recorded in detail, especially when it comes to personal finances.

Remember that adding extra information to either incomes or expenses is done by following the same steps. We will present an example for an expense, but you would edit an income in the same way.

The option to save photos with expenses and incomes becomes available with Toshl Pro or Toshl Medici subscriptions.

1. Selecting the Photos feature

Let’s say that we’re saving an expense during a road trip through Norway. Also known as “the land of reasonable price tags”, the country’s landscape is laced with fjords, and we took a ferry ride to cross one. The price was 120 Norwegian krone (sign: kr, code: NOK), saved under the category “Transport”, paid in cash.

To get to the Photos feature, we tap on the far right icon below the date tab to reveal additional options.


2. Attaching a photo to your expense

Tapping on the “Photos” icon reveals two options:

  • Take photo
  • Choose from library.

You can either take a new photo of the receipt, invoice, payslip or some other document you wish to attach to your expense, or select an existing image from your photo library on the mobile device itself.

Tapping on the first option opens the Camera app on your device. Take a picture as you would normally do, and confirm the selection.

The second option opens your photo library, where all you have to do is navigate to the desired image, select it, and it will get attached to your expense. You can add up to 4 photos for each entry.

The entry can then be saved and the photos will be stored next to your income or expense.

The file formats supported for uploading images are PNG, JPG and JPEG.


3. Reviewing saved photos

Images are available for review in the entries’ details. Select the expense from the overall list …

… and tap on it to bring up a detailed view.

You can edit the entry at any time by adding more photos or removing them altogether.


Besided the receipts you can, for example, also save photos of invoices and payslips next to your records of incomes. Attach pictures of documents such as warranties of products you bought, invoices for tax review purposes, and photos of actual products and services you had just documented.

It’s always better to store too much info about your financial flows than too little, and it will give you a chance to come back to your entries at a later date and easily remember what those expenses and entries were about.


Related articles:

Toshl monster keeps his eye on your spending habits, taking pictures as proof. Say cheeeeese!


Posted in Android Tutorials, Tutorials

How to Set Reminders for Upcoming Bills, Incomes and Make Sure You Pay Them (Android)

Considering all the responsibilities and information we have to juggle with every day, it’s no wonder that sometimes things slip our minds. Set reminders in your Toshl app to receive notifications about the expenses, incomes and transfers that will require your attention in the future, and keep those financial plans in check.

Setting up reminders with your incomes, expenses or transfers is done in the same way. We’ll review how to do it for an expense, but you would set up a reminder for other types of entries by following the same steps.

The option to set reminders becomes available with Toshl Pro or Toshl Medici subscriptions.


1. Selecting the Reminder feature

Let’s say that we have borrowed 50 € from a friend and we want to pay him back on April 6th. Because we have good manners, we will set ourselves a reminder, just to make sure that our debt gets paid on time.

After entering the amount, selecting a category and an account (we’ll pay cash) as well as the date, we continue downwards to the row of options under the Date tab. The option to set a reminder for our entry is marked with a tiny bell icon.


2. Setting up reminders

Tapping on the Reminder tab opens a list with the first reminder waiting to be set. The options are:

  • One day before
  • On the day it’s due
  • Custom reminder
  • Never

With first two selections the reminder is by default set for 11 a.m., and a custom option allows for a more specific time period. With it you can set exactly how many days, weeks, months or years before the expense is due you wish to receive a reminder.

The time setting allows you to set exactly when you’d like to be reminded of the expense.

It is possible to save 5 different reminders for each entry, with all the options turned on at once.


3. Reminder notifications

A notification about the expense will appear on your device at the specified time.

The number of notifications requiring your attention is also specified on the Toshl app’s icon as well as in the app’s menu …

… and inside the Monthly overview tab.

In “Settings” – “Notifications” menu you can turn the notifications off completely, or enable them to also arrive by email, for those instances when an in-app notification catches you at a bad time and you have to quickly dismiss it. There you can also set a daily reminder to enter your expenses. This way you will always stay on track with the upcoming bills and incomes.

The in-app notifications are simultaneously triggered in the Toshl app on your mobile device as well as in the Toshl web app online.


4. Paid / Unpaid function

When a reminder is active for an expense that’s due to be paid, a red dot appears in the entry details tab. The dot turns green when you mark the expense as paid.

The paid / unpaid status is shown only for your reference and it does not affect account balances and others sums. All entries up to the current date get registered in balances of financial accounts, regardless of the expense’s status and whether it has already been paid or not.


With incomes, the function is marked as “Received / Unreceived”, but otherwise works in the same way.


5. Reviewing entries with reminders

The entries that include reminders will be diplayed on the overall list with a red dot, indicating that the expense hasn’t been paid yet.

The reminder information is also listed in the Expense details view. The setting itself can be edited at any time, in the same way as all the other specifications for your entries.


6. Reminders and repeats

Reminders are automatically set for most of the automatically repeating entries. The weekly, monthly and yearly repeats, as well as the custom repeats (except custom daily repeats) will automatically set two reminders to notify you of an upcoming expense:

  • for one day before
  • on the day the expense is due.

Such events are listed with the red dot, and also with the “R” icon that signifies repeats.


Whether it is regular expenses like utility bills and subscription services, unplanned short-term loans, or monthly transfers into your savings account, it is always better to be prepared than taken by surprise.

Make good use of bill reminders in the Toshl Android app for an even better control of your personal finances.


Related articles:

You can count on Toshl monsters to remind you to pay off your bills. How gently it’ll happen depends on your system settings … and their mood.


Posted in Android Tutorials, Tutorials

Organize Bills and Salary by Repeating Entries Automatically (Android)

Certain things tend to repeat themselves. Some are pleasant, like spring or holidays. Others, like mortgage payments and utility bills, are more of a necessary evil.

Use the repeat option in the Toshl app to keep track of your reccurring expenses. You can set the interval so that the expenses repeat daily, weekly, monthly, or whenever you decide. Remember that adding extra information to either incomes or expenses is done in the same way. We will present an example for an expense, but you would edit an income following the same steps.

The option to repeat expenses, incomes and transfers automatically becomes available with Toshl Pro or Toshl Medici subscriptions.

Repeating entries are appropriate for use on financial accounts you otherwise track manually. Accounts that are connected to your bank will add the entries automatically as they come in, so such repeating settings are not necessary there.


1. Selecting the Repeats tab

After adding the basic expense information, continue downwards to the row of icons under the Date tab. The option to automatically repeat the entries is marked with an icon featuring the letter R in an arrowed circle.


2. Repeat options

2.1 Repeat intervals

The expense can be repeated:

  • daily
  • weekly
  • monthly
  • yearly
  • on weekdays
  • on weekends
  • in a custom interval.

Tap on the Repeat option and select a suitable interval from the menu.

For a common recurring expense such as utility bills you can specify a monthly repeat and leave the “End repeating” option set to “Never”.


2.2 Ending the repeats

The repeats can go on forever until you stop them, stop after a certain date, or stop after a set number of repetitions. Select an option by scrolling through the menu.

To end the repeats on a specific date, use the calendar to set the correct day, month and year of the final repetition.

For a set number of repetitions simply designate a number from the list.

The date of the final repeat will be displayed on the screen. Keep in mind that your first expense is included in the repeat count.


2.3 Custom repeat

The “Custom repeat” option allows you to set a repeat with an uncommon interval. For instance, you could use it to record a short-term loan that would be paid back in 10 instalments (partial payments) every other week.

In such case you would set the custom repeat to 2 weeks …

… and proceed to set the repeat to 10 times.

The date of the final repeat will be displayed on the bottom of the screen. As mentioned before, your first expense is included in the repeat count.


3. Automatic reminders

Setting a weekly, monthly and yearly repeats, as well as the custom repeats (except custom daily repeats), automatically turns on the reminder function to notify you of an upcoming expense. This is indicated with the tiny bell in the icons line-up.

The first reminder is set for the day before the expense, and a second one on the day the expense is due. You can modify the reminders according to your needs, or cancel them altogether.


4. Managing repeating expenses

Entries that include an automated repeat are marked with an “R” icon on your list of expenses.

The set interval and possible alerts for the payment are included in the details of an expense.


4.1 Edit repeating expenses

You are able to edit or delete such expenses in the same way as all other entries. However, you do have to specify if you wish to apply changes only to the expense you are editing, just to the expenses that are planned for the future, or to all the repetitions of this expense.

A dialogue with these options also appears whenever you attempt to delete an entry with a set reminder.

After a repeating expense has been created, it is not possible to edit the overall repeat setting – with the exception of setting it to “Never” and cancelling the repetitions. For example, if an expense was set to repeat on the 10th every month, it cannot be changed to repeat on the 15th, or for instance switched from a monthly to a weekly repeat.

The date can be edited only for an individual expense inside the repeat frame, but the repeating for the expense will continue as it was set initially.


4.2 Cancel repeating expenses

To permanently change the pattern of a recurring expense, you have to stop the expense from repeating and enter a new one with new repeating dates.

To end a recurring expense, tap the “Edit expense” option, adjust the repeating interval to “Never”, and confirm. This will set the repeating of the expense to end on today’s date, and in effect turn off all future reiterations.

When modifying or deleting the entries with repeats, make sure not to delete all the repetitions of an expense if you wish to keep the past entries in your record of expenses.


5. Examples for using repeats

5.1 Example: salary – repeating income

The most clear-cut example of a repeating income is the monthly salary. Let’s record a regular income of 1400 €, in a category “Salary”, for the financial account “General”. The event will be repeated monthly on the selected date, with a reminder on the day it’s due.

That is all you have to do to have your income automatically recorded and repeated. Simple.


5.2 Example: subscriptions – repeating expense

Another good example for the use of repeats are the subscription services. Let’s check the recurring expenses for a media streaming subscription for 7.99 € on the 12th each month, file hosting for 9.99 € on the 10th, and, most importantly, a monthly delivery of socks for 12.02 € on the 23rd. These amonts will be billed on the credit card (be careful when selecting the appropriate financial account).

We will record them all under a category “Subscriptions” and with appropriate tags to further simplify the overview of our expenses later on.


5.3 Example: repeated transfers into a savings account

Repeats can also come in handy when managing your savings account.

First, open up a new transfer tab. This can be performed by tapping in the upper right corner on the tag indicating which month’s time span you’re currently observing, or by swiping from anywhere on the rightmost edge of the screen toward left to access the accounts and time span sidebar.

Additionally, you can drag the “+” button across the screen and release it when the icon turns grey, indicating a new transfer entry.

Next, enter the amount as well as the “Source” and “Destination” accounts – in our case that’s “General” and “Savings”. Proceed with the date, an optional description, and finally the repeat setting.

This way the Toshl app will remind you each month, on the 16th, that 300 € is waiting to be transfered from your general financial account into savings.


5.4 Example: paying off debt in instalments – repeating expense

Let’s say that you bought a 750 € custom paint job for your car, as one of those impulse purchases. No reason to worry, here’s how you can quickly split your expense into, for instance, 3 instalments with a custom repeat every 3 weeks, for a total of 3 repeats of 250 € each.

Other great examples to use repeats with your incomes and expenses in Toshl include tracking of utility bills, rent, taxes, insurance, and many more.


6. In conclusion

With such versatile options, why not take advantage of the repeating entry function and include it into your monitoring of personal finances. A brief moment to consider possible patterns in your financial flows now could save you loads of time later on.


For additional information and, perhaps, inspiration on how you might be able to use repeats with your financial tracking, follow this link to learn more about tracking of loans, repaying debt, and shady loansharks.


Related articles:


Posted in Android Tutorials, Tutorials

Add Venues and Locations to Your Expense Tracking (Android)

The more information you keep on your earning and spending habits, the easier it is to take control of your personal finances. In the following paragraphs we will take a closer look on how to record where exactly your spending takes place.

Remember, adding extra information to either incomes or expenses is done in the same way. We’ll show you how to do this for an expense, but you would add location information to an income in an identical fashion.


1. Selecting the Location function

After you have entered the amount for your expense and selected a category, continue downwards to the row of icons under the Date tab. Tap the icon on the far left to bring up the Location function.


2. Entering the location details

The suggestions of nearby locations and venues will show up automatically.

The locations displayed are the venues that exist in your immediate surroundings. If you already see the venue where you spent your money, just tap on it and the location will be added with your expense. Save the expense and you’re all done.

If the location you’re searching for isn’t on the list, tap on the “More locations” option below the suggestions to expand the list of venues nearby. Alternatively, it is always possible to search for the location manually.

This works well if you are adding an expense on the spot, but if you’re already somewhere else or want to make your entry more precise, there is another trick you can use to quickly specify the town or city where the expense took place. Tap on the search field and type the name of the venue you’re looking for, add a comma (,) and type in the town or city where the venue is located.

Check this guide for more information about the use of a comma with locations.


3. Reviewing locations

Access the menu by tapping the main menu button in the top left corner or swiping from the left edge of the screen. To review saved locations, navigate to the Locations option.

The Locations tab displays a map with all the expenses with saved locations. Tapping on the mark on a map brings up a bubble with the amount that was spent there, and the number of visits to the venue. If you’ve been spending at a single location multiple times, these entries will be summed up on the location.

Location is also displayed in the details of an expense you’ve saved.


4. Filtering locations and filtering by locations
The locations map, like all the data in Toshl, depends on the filtering options that are set at the time. By default the map will display all the locations in your current financial month.

Need to see where you’ve been spending in the last two months, perhas in the last year, or during any other time period? Simply adjust the time span by tapping in the upper right corner where you can see a tag indicating which month you’re currently observing, or swipe from anywhere on the right edge towards the centre of the screen.

In the web app you can filter your expenses not only by time spans or financial accounts, but also by tags and categories.


Related articles:

Toshl monster’s recent locations: Naples for pizza, Brazil for a cup of coffee, and Tennessee for one Elvis-inspired pompadour!


Posted in Android Tutorials, Tutorials