Category: Web App Tutorials

How to Set Reminders for Upcoming Bills, Incomes and Make Sure You Pay Them (Web App)

Considering all the responsibilities and information we have to juggle with every day, it’s no wonder that sometimes things slip our minds. Set reminders in your Toshl app to receive notifications about the expenses, incomes and transfers that will require your attention in the future, and keep those financial plans in check.

Setting up reminders with your incomes, expenses or transfers is done in the same way. We’ll review how to do it for an expense, but you would set up a reminder for other types of entries by following the same steps.

The option to set reminders becomes available with Toshl Pro or Toshl Medici subscriptions.


There’s no horsing around when it comes to unicorn expenses.


1. Selecting the Reminder feature

Let’s say that we have borrowed 50 € from a friend and we want to pay him back on April 6th. Because we have good manners, we will set ourselves a reminder, just to make sure that our debt gets paid on time.

After entering the amount, selecting a category and an account (we’ll pay cash) as well as the date, we click the “Show more” button on the bottom of the expense window to revel additional optional features.


2. Setting up reminders

Selecting the Reminder tab opens up the menu with options:

  • 1 day before
  • On the day it’s due
  • Custom reminder
  • Never

With first two selections the reminder is by default set for 11am, and a custom option allows for a more specific time period. With it you can set exactly how many days, weeks, months or years before the expense is due you wish to receive a reminder, and precisely at what time.

It is possible to save 5 different reminders for each entry, with all the options turned on at once.


3. Reminder notifications

Reminders are displayed in the “Monthly overview” page of your Toshl app.

Highlighting the notification brings up an option to mark the expense as paid.

Notifications can be turned ON/OFF altogether in Settings – Notifications. In the menu you can enable for the notifications to also arrive by email, for those instances when an in-app notification catches you at a bad time and you have to quickly dismiss it. This way you will always stay on track with the upcoming bills and incomes.

The in-app notifications are simultaneously triggered in the Toshl web app as well as on your mobile devices where you’re keeping Toshl installed.


4. Reviewing entries with reminders

The entries that include reminders will be diplayed on the overall list with a little bell icon.

The reminder information is also listed in the Expense details view. The setting itself can be edited at any time, in the same way as all the other specifications for your entries.


5. Reminders and repeats

Reminders are automatically set for most of the automatically repeating entries. The weekly, monthly and yearly repeats, as well as the custom repeats (except custom daily repeats) will automatically set two reminders to notify you of an upcoming expense:

  • for 1 day before
  • on the day the expense is due.

Such events are once again listed with the bell icon, and also with the “R” icon that signifies repeats.


6. Paid / Unpaid function

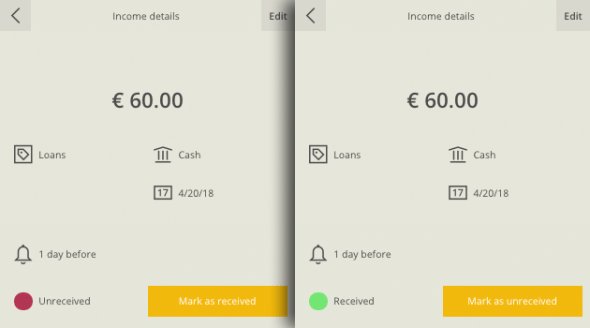
When a reminder is active for an expense that’s due to be paid, a red dot appears in the entry details tab. The dot turns green when you mark the expense as paid.

The paid / unpaid status is shown only for your reference and it does not affect account balances and others sums. All entries up to the current date get registered in balances of financial accounts, regardless of the expense’s status and whether it has already been paid or not.

With incomes, the function is marked as “Received / Unreceived”, but otherwise works in the same way.


7. Daily reminder

A daily reminder to enter expenses is an option, available in the general Settings menu.

Here you can set an exact time when you’d like to be reminded – gently – to record your expenses for the day.


Whether it is regular expenses like utility bills and subscription services, unplanned short-term loans, or monthly transfers into your savings account, it is always better to be prepared than taken by surprised.

Make good use of bill reminders in Toshl web app for an even better control over your personal finances.


Related articles:

Toshl monsters use reminders for that first morning cup of coffee. They never forget about the other 45 cups over the course of the day, either.


Posted in Tutorials, Web App Tutorials

Track Credit Cards on Toshl

Credit card spending can quickly get out of hand, so it’s good to keep track of how much you spend and when that credit card bill is due.
If your credit card or bank account is one of those supported for syncing in Toshl Medici (log in required), this can be done automatically and the expenses and balances will just fly in.
If you track you finances by adding your expenses to Toshl yourself, here’s how to best track your credit cards:

1. Add all your credit cards as separate financial accounts

More info on how to add accounts is available here.

2. Add your credit card spending during the month

Add expenses made with your credit cards on the day you pay for them. Just make sure that the credit card account is selected correctly.

3. As you spend, the credit card account balances will become negative

That’s how you’ll know how much the credit card bill will cost you when it comes. You can see these balances in the account list on the right.
In the mobile apps, swipe from the right to open the account list.
On the web app, click the accounts/filtering button on the top right of the screen.

4. When the credit card bill comes, make a transfer from your bank account

The transfer should be from the bank account from which you pay your credit card bill. The transfer destination account is the account of the credit card you’re paying off.
This transfer will cover the negative balance of the credit card account, so you can start the new month fresh.
If you don’t have any outstanding credit card debt and haven’t made purchases since the credit card billing period concluded, the account balance should be 0.


5. Set the transfer from your bank to your credit card to repeat automatically

Usually the transfer will repeat each month, on the day that you get the credit card bill.
For the transfer amount, you can set an approximate amount you expect for the credit card bill and then edit it to a more exact one when the bill comes.
Reminders will also be set by default when you make the transfer repeat automatically. One a day before the bill is due and one on the day. You can customize the reminder timing.
That way, you’ll be notified before and on the day when your credit card bill is due.
Once you have this set up, you can simply enter the exact amount on the transfer each month and the credit card balance will provide some much needed clarity.
To get warned about your spending tempo beforehand, consider setting up a budget. You can also set it to track just selected accounts, like your credit card.
Adding more than 2 financial accounts and automatically repeating entries require Toshl Pro. Automatic syncing with banks and credit cards is available with Toshl Medici.
Toshl monsters can be a bit old school. They still prefer cash briefcases to credit cards.
Posted in Android Tutorials, iOS Tutorials, Tutorials, Web App Tutorials

Hint: Zero-in on a location. All you need is a comma.

A new feature gradually appeared in the Toshl Finance apps in the recent months. Wondering if you’ve noticed it already?


Let’s say you’re adding a location to your expense or income, but are already far away from the place where the purchase happened. Normally, Toshl suggests closest places around you. When you search, it will also search for venues in an about 30 kilometre radius. That can be quite useless when already further away.


That’s why you can now specify the town or city where the expense took place. Simply type-in the name of the venue you’re looking for, add a comma (,) and add the town or city where the venue is.


For example, let’s look for a pub called “Godec” in Ljubljana*, the capital of Slovenia.

Search for: “Godec, Ljubljana”


location searching with town / city parameter

expense with foursquare location selected


There you go. Your beers can now be properly attributed to your purveyor of choice, even if you’ve only thought of noting it in Toshl the next day.


*Yeah, Ljubljana is actually spelled that way. Pronunciation isn’t that difficult though, just go with: “Loo-blah-nah”, like most locals do.

Posted in Android Tutorials, Announcements, iOS Tutorials, Tutorials, Web App Tutorials

Two-Factor Authentication and How to Use It

What is two-factor authentication?

Two-factor authentication is an extra layer of security for accessing your Toshl user account. You would normally log in to Toshl with your email and password, or using the Facebook and Google log in options. That’s the first authentication factor.

When you activate two-factor authentication, Toshl will ask you for another code before you can log in. That authentication code is a 6-digit number, which you get from a special app on your phone or computer.

The authentication code is generated automatically according to an algorithm. Unlike your password, the authentication code changes every 30 seconds. That means you’ll always need the authentication app on your phone present to log in.2-factor authentication Toshl web app


Why is two-factor authentication important?

It makes it much harder for someone to gain unauthorized access to your account. While protecting your account with a good password is usually enough, there can be circumstances where such an extra security barrier is very useful.

For example, if you used the same password on another service which gets hacked, the details can leak revealing your password. Perhaps someone can guess your password or gain access to your Facebook or Google account. In such cases, someone could try logging in with that password to Toshl as well.

If you have two-factor authentication enabled and set up on your phone, they would also need physical access to your unlocked phone to be able to log in, which would likely prevent them from accessing your Toshl account.

While two-factor authentication provides an important extra layer of security, it’s still important to take basic security precautions:

  • Use hard to guess passwords, which are also long enough to be difficult to guess with automatic attempts.
  • Do not use the same password on several services.
  • Always log out of Toshl when using it on devices used by multiple people, or on devices which you leave unlocked.
  • Lock your devices with a code/password.

Toshl monster with a number and shut mouth


How do I set up two-factor authentication?

  1. Go to toshl.com and Log in.
  2. Go to user settings (Me) in the main menu and turn ON the option Two-factor authentication.

  1. A wizard will open, guiding you through the process.
  2. Download an authentication app on your phone.
  3. Add a new code in that app by scanning the QR code on your screen.
  4. Download the file with recovery codes. This is important. In case you lose your phone, these codes will enable you to log in. Save them in a safe place.

text file recovery codes download icon

  1. Type in the newly generated code to Toshl to confirm all is working well and finish activating two-factor authentication.
  2. Great success! Much rejoicing. 2-factor authentication is now active whenever you log in.

great success bathing suit monster


What are these authentication apps? Which ones can I use with Toshl?

This kind of two-factor authentication follows a common standard, so there are a whole bunch of apps which can help you with generating these authentication codes, once you set it up like described above.

Below are some popular authentication apps that we found useful. You can use others as well, just make sure you pick one from a trustworthy developer.

Google Authenticator (Android, iOS)

Microsoft Authenticator (Android, iOS, Windows Phone)

Authy (Android, iOS)


Password managers with support for two-factor authentication codes

1Password

LastPass


Do I have to enter this every time? Which Toshl apps demand the extra code?

You have to enter the code every time you log in, provided you were logged out before.

The web app will require the extra code whenever you log in anew. If you check the “Remember me” option when logging in, Toshl won’t request the two-factor code until the next time you Log out, or the session expires. So if you log in using “Remember me” then just close the browser without logging out, you likely don’t need to enter it again the next time you open toshl.com.

The mobile app will also require the extra code whenever you log in anew. So you just enter the two-factor code the first time you log into the app, then your log in is remembered unless you log out in user settings (Me) of the mobile app.

If you re-install the app or log out, you will need to enter it again.

two-factor authentication on the Toshl Finance Android app

It’s a good idea to lock the Toshl app with a passcode or fingerprint as well as your entire phone.


What if I lose my phone or accidentally delete the authentication app?

Try not to (?‍✈️ salute to Captain Obvious). If you do, you can log in using the recovery codes you saved during the set up process.

It’s very important to save the recovery codes and store them in a safe place. Save them on your computer, external drive or even print them out, if you’re more certain you’ll find them that way later on.

Recover code 2 factor authentication Toshl web app


When Toshl asks you for the authentication code, click the option to log in using recovery codes. Enter it and log in. Each code can only be used once, so you have 10 log-ins with the codes available altogether.

If you permanently lost your phone or deleted the authentication app, go to user settings (Me), deactivate the two-factor authentication, then set it up again using the new device/app.


Why not send authentication codes via SMS?

We realize that’s what a lot of other services do, but that way is less secure. It depends on your mobile phone service provider, but in lots of cases it didn’t take much social engineering for dedicated hackers to convince them to transfer the phone number to another SIM card. That way, your authentication codes could be intercepted without you even knowing. There have been cases of this happening in the past.


monster with a safe

Posted in Android Tutorials, iOS Tutorials, Tips & Tricks, Tutorials, Web App Tutorials

Financial Planning (Web App)

Know your past spending and earning patterns, plan for the future. This is what the Planning graph is all about.

There are 4 different tabs on top, to help with different parts of your financial plan.


Balance – monthly balance of incomes and expenses

This balance is separate for every month and is calculated like this: “incomes this monthexpenses this month” = “monthly balance“. For total balance in all time, see the net worth graph.

Staying above the 0 line is crucial. At least on a yearly average, if it doesn’t exactly work out every month.

financial planning - monthly balance


Expenses – spending per month

Shows the sum of expenses each month, but can also be filtered to display spending on certain categories, tags, locations and financial accounts.

financial planning - expenses


Incomes – earnings per month

Shows the sum of incomes each month, but can also be filtered to display earnings on certain categories, tags and financial accounts.

financial planning - incomes


Net worth – total balance of your financial accounts

These funds accumulate if you have regular surpluses on your monthly balances. The amounts reflect the account balances at the end of the month.

financial planning - net worth (total account balance)


Click & hold for details and a lollipop

To get the exact value for each column, click and hold somewhere on the graph.

A “lollipop” will show up, displaying the exact value for the month.

Past months will also display averages for the latest 12 months, while future months can also show estimates for the period.

financial planning - financial month details (lollipop)

toshl accounting monster with lollipop

River flow – see the financial flows each month

You’ll notice that the River flow graph is displayed below the multi-month graph. It shows how your incomes and expenses compare to each other and your budget in an individual month. If you have a monthly budget for all expenses, it will include it in the calculation as well, so you’ll know how much you can spend while keeping within your budget limits.


Travel in time

14 months are shown on the graph. By default 8 past ones, the current month and 5 future months.

You can move through time by using the < > arrows on the left and right side of the graph or by using the general time span settings on the top of the page.

If you’re interested in sums for a certain period, you can also select a custom time span. The selected months will be displayed in darker color below the graph and you’ll see sums for the entire period.

financial planning - custom time span


Filter by category, tag, account, location

You can zero-in on specific data you’re interested in and want to see over a longer period of time.

Let’s say you want to know how your spending on Food & Drinks varies in time. Click on “Expense categories” in the right sidebar, “Select categories” and click “Food & Drinks”. The graph will immediately filter to show you only spending data for the Food & Drinks category, so you can see how it varies through the year.

You can narrow it down even further by selecting a tag. Do the same in the “expense tags” section and you can see how much you spent only on restaurants, alcohol, groceries or a combination of multiple tags.

financia planning - filer by account, category, tag, location

You don’t have to pick only one filter. They can be combined. For example, you can set it to only show expenses paid with MasterCard (financial account), for Leisure (category) for books, movies and music (tags) in HMV Manchester Arndale (location).

This filtering is global, so it will work with all the data in Toshl apps. You can also turn off the filtering panel by clicking on top right, to reveal the expense list below. Any filter that’s applied will be displayed on the top right next to the filtering funnel icon. If no filters are applied, it will just say “All accounts”.


Estimates and planned expenses

You’ll notice that the future months aren’t as colorful on the graph. That doesn’t mean that the future isn’t bright, just a bit hazy for now.

The semi-transparent columns in future months can display your planned entries, future estimates or both.

financial planning - estimates and planned entries


Planned entries

These are the expenses, incomes and transfers you have already entered into the future, or were generated automatically based on the repeating entry settings that you have set earlier. We advise to add much of these as you can possibly predict. They’ll help you plan your future months so you can keep financial stress down to the minimum.

These planned entries can be set to display in the graph or not. You can set this by clicking the month on the top of the page, then setting the switch for Planned ON or OFF. This will also affect other graphs in Toshl.


Estimates

Estimates project your past trends in earning and spending into the future, providing a rough guide of what to expect with your balances, spending, earnings or net worth if the current trends continue as they have so far.

As it’s based on your past data, the more time you’ve been tracking your finances with Toshl, the more precise they can become. We’ll also be improving the algorithm for this over time, so it will become better at guessing your spending patterns.

You can switch estimates ON or OFF in the filtering sidebar on the right side of the graph.


The Planning feature is available with Toshl Pro. Manage and save money better for the price of a coffee per month.

Improving and maintaining apps takes resources and time. By upgrading, you’re supporting the future development of Toshl Finance. Thank you!

Posted in Tips & Tricks, Tutorials, Web App Tutorials