Effectively managing your personal finances begins by keeping a good overview over your financial flows. That is why adding incomes and expenses into your Toshl app was made simple. We surely wouldn’t want you to be wasting your time, that’s something even money can’t buy.
This tutorial is for adding entries to financial accounts that you track manually. If you use connected financial accounts with Toshl Medici, the entries will fly in automatically as they show up on your bank / financial service.
For a basic expense all you need to do is: enter the amount, select a category and click Save. All done.
Toshl also enables you to add richer data, automate the entries or get reminded about them. There are quite a few useful tricks along the way. Let’s take a more detailed look on how to add incomes and expenses in the Toshl web app.
1. Add a new expense or income
Both options are located in the menu on the left side of the screen. Navigate to either one and click the large “+” button in the bottom right corner for a new entry; a red one for expenses and a green one for incomes.


Remember, after selecting either the income or expense, both follow the same steps and include the same options. Here, we will present an example for entering a new expense.
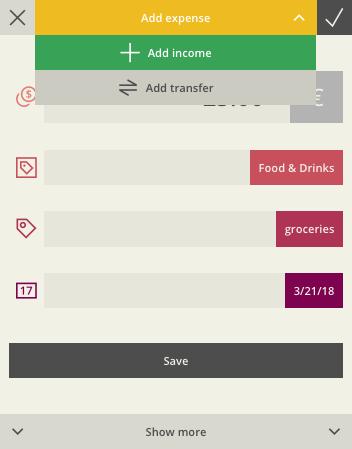
2. Adding an expense
2.1 The amount
Click the “+” button in the bottom right corner and a new window will pop up. You can then enter the amount of the expense.

Use a decimal separator when necessary. Decimal separator is either a point or a comma. You can use either. Which one is used primarily in the forms and with the display of sums in Toshl depends on your regional formatting setting. Check the Regional Settings guide for more details.
Make sure to use the correct currency. Clicking the currency symbol, for example the $ or € sign‚ will open a menu with all the currencies available in Toshl. Whichever currency you used when saving the last expense will remain the default currency until you change it back.
It is possible to quickly switch between adding an income, expense or a transfer between accounts by using the shortcut on the top edge of the window. Simply select the option you need.

2.2 Categories
Click in the Category field to display and select one of the categories. Assigning a category is required for every entry.

While preset categories cover most types of expenses and incomes, you can always add your own and edit them according to your needs. Simply type in the title of your new category and confirm it by pressing Enter.
This new category will be stored after saving this entry and can be used with your future entries. Begin typing its name into the category window and it will be brought up automatically. This works for tags as well.
For further information check the Edit Categories and Tags guide.
At this point, you can already save your expense since all the required information – the amount, category, account and date – has already been entered or pre-set. You can also add additional details to your entry.
2.3 Tags
You also have an option to assign multiple tags to your entry. Use a tag like “groceries”, “restaurant”, “parking” and others to add further details to your entry.
Just like with categories, you can always add your own tag by typing it into the window and confirming the input with the Enter key. Unlike the categories which are limited to one per entry, multiple tags can be assigned to each income or expense. 
Once a category is selected, the tags are sorted automatically based on your category selection. Tags that were sorted into the category you selected will be displayed first, followed by all the rest. You can still use any tag with any category, but this will make it easier to find the correct one.
The second sorting criteria is your frequency of use – most commonly used tags will eventually be brought up to the front of the list.
You can modify and manually assign tags to specific categories at any time. Consult the Edit Categories and Tags guide for more details.
2.4 Accounts
This option is displayed only if you use more than one financial account. In that case you will be given the option to specify an account for your expense.
When you sign up with Toshl, a Cash account is added automatically, but you can always add more. Check your accounts by clicking the “Accounts” button on the top right in the web app, or read more about adding financial accounts.

2.5 Date
The date of the expense is automatically set to the present day when viewing the current month. You can of course change it by clicking on the set date and selecting a different one from the calendar. Any entries set in the future will be grouped as “planned” and displayed on top of the expense list.

Clicking on a month label brings up a quicker month selection.

Clicking on the year label displays a quicker year selection.

The date format can be adjusted in Settings, under the General tab. Check the Regional Settings tutorial for more information.
It is not possible to set the date picker to display Sunday as the first day of the week, it will always start on Monday.
3. Advanced options
Clicking the “Show more” bar on the bottom of the entry window displays the options for additional information and automation:

While the location and description entry is available to all Toshl users, adding repeats, reminders and photos becomes available with the upgrade to Toshl Pro or Toshl Medici.
4. Save the entry
To save, simply click the Save button to confirm and the expense will appear in the expense lists, graphs and other sums.

5. Edit, duplicate or delete an entry
After you have saved your expense, it will appear on the Expenses list inside the Toshl web app. Clicking on an entry will open the expense details tab on the right side of your screen. Here, you can review the details of your entry or edit, duplicate and delete it by choosing the appropriate option from the screen.

When you wish to store an expense that’s similar to a previous one, you can save yourself a few clicks by using a duplicate. Selecting this option will re-open the expense window with all the details. There you will be able to make all the modifications, for example change the amount, category or date, and save it as a new expense.
6. Transfers
Besides incomes and expenses you can also record a money transfer between two financial accounts. This option is accessible from a quick menu on the top upper edge of a new expense window (shown in section 2.1) or from the Accounts menu (described in section 2.4 a few paragraphs above).
![]()
After selecting the “Add transfer” option you are presented with a similar form as before, except that now you have to select two accounts. The first one is the source, and the second one the destination account.
Let’s say that you use your credit card at an ATM to withdraw cash. That withdrawal should be noted in Toshl as a transfer from the credit card account to cash.
![]()
Entry fields function the same as before, except that there are no categories or tags. Additional options under “Show more” include Description, Repeats and Reminders.
When ready, confirm your transfer by clicking “Save”. Your transfer is now shown under both incomes and expenses if all financial accounts are set to display and marked with a special transfer icon with two arrows. If you filter the accounts to a single one, the transfer is displayed either in the expense or income list, based on whether it’s an outgoing or incoming transfer, relative to that financial account.
![]()
Any transfer can be viewed, edited or duplicated just like incomes and expenses.
Related articles:

Toshl monsters love nothing more than to help you keep track of your personal finances. And huge lollipops, yep, definitely love those.