Category: Tutorials

How to Set Reminders for Upcoming Bills, Incomes and Make Sure You Pay Them (Web App)

Considering all the responsibilities and information we have to juggle with every day, it’s no wonder that sometimes things slip our minds. Set reminders in your Toshl app to receive notifications about the expenses, incomes and transfers that will require your attention in the future, and keep those financial plans in check.

Setting up reminders with your incomes, expenses or transfers is done in the same way. We’ll review how to do it for an expense, but you would set up a reminder for other types of entries by following the same steps.

The option to set reminders becomes available with Toshl Pro or Toshl Medici subscriptions.


There’s no horsing around when it comes to unicorn expenses.


1. Selecting the Reminder feature

Let’s say that we have borrowed 50 € from a friend and we want to pay him back on April 6th. Because we have good manners, we will set ourselves a reminder, just to make sure that our debt gets paid on time.

After entering the amount, selecting a category and an account (we’ll pay cash) as well as the date, we click the “Show more” button on the bottom of the expense window to revel additional optional features.


2. Setting up reminders

Selecting the Reminder tab opens up the menu with options:

  • 1 day before
  • On the day it’s due
  • Custom reminder
  • Never

With first two selections the reminder is by default set for 11am, and a custom option allows for a more specific time period. With it you can set exactly how many days, weeks, months or years before the expense is due you wish to receive a reminder, and precisely at what time.

It is possible to save 5 different reminders for each entry, with all the options turned on at once.


3. Reminder notifications

Reminders are displayed in the “Monthly overview” page of your Toshl app.

Highlighting the notification brings up an option to mark the expense as paid.

Notifications can be turned ON/OFF altogether in Settings – Notifications. In the menu you can enable for the notifications to also arrive by email, for those instances when an in-app notification catches you at a bad time and you have to quickly dismiss it. This way you will always stay on track with the upcoming bills and incomes.

The in-app notifications are simultaneously triggered in the Toshl web app as well as on your mobile devices where you’re keeping Toshl installed.


4. Reviewing entries with reminders

The entries that include reminders will be diplayed on the overall list with a little bell icon.

The reminder information is also listed in the Expense details view. The setting itself can be edited at any time, in the same way as all the other specifications for your entries.


5. Reminders and repeats

Reminders are automatically set for most of the automatically repeating entries. The weekly, monthly and yearly repeats, as well as the custom repeats (except custom daily repeats) will automatically set two reminders to notify you of an upcoming expense:

  • for 1 day before
  • on the day the expense is due.

Such events are once again listed with the bell icon, and also with the “R” icon that signifies repeats.


6. Paid / Unpaid function

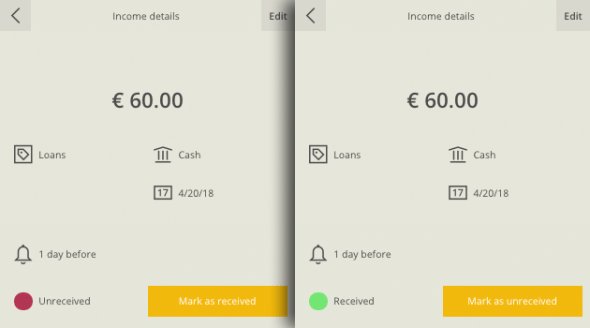
When a reminder is active for an expense that’s due to be paid, a red dot appears in the entry details tab. The dot turns green when you mark the expense as paid.

The paid / unpaid status is shown only for your reference and it does not affect account balances and others sums. All entries up to the current date get registered in balances of financial accounts, regardless of the expense’s status and whether it has already been paid or not.

With incomes, the function is marked as “Received / Unreceived”, but otherwise works in the same way.


7. Daily reminder

A daily reminder to enter expenses is an option, available in the general Settings menu.

Here you can set an exact time when you’d like to be reminded – gently – to record your expenses for the day.


Whether it is regular expenses like utility bills and subscription services, unplanned short-term loans, or monthly transfers into your savings account, it is always better to be prepared than taken by surprised.

Make good use of bill reminders in Toshl web app for an even better control over your personal finances.


Related articles:

Toshl monsters use reminders for that first morning cup of coffee. They never forget about the other 45 cups over the course of the day, either.


Posted in Tutorials, Web App Tutorials

Ready. Set a Start Date for Bank Account Connections. Go!

With Toshl Medici, you can connect your bank account to Toshl and make it easier to track your finances and budget. Sometimes though, it’s useful to limit the span of the transactions that are imported. Perhaps you’ve decided to wipe the slate clean with a New Year’s resolution and only track your finances properly from the January 1st onward. Or perhaps you tracked that financial account manually earlier and want to avoid the duplication of data.

In any case, you can now precisely set how much data to import when connecting a bank or other financial account.

While the images presented here are from the Toshl Finance web app, this works the same way in the Android and iOS apps.

After you have connected your account, you’ll be presented with these options.Bank import time span options

By default, Toshl will import all available past data. From how far back the data can be imported will differ from bank to bank. With most bank connections up to 18 months of data is available, while some are limited to a few weeks.

You can also import from today on, or from a specific date of your choosing. Pick the date on the calendar, click Finish and you’re all done.

import date pickerYour fresh financial year can now begin in earnest…

monster treadmill…and the Toshl monsters will be here to remind you of your other New Year’s resolutions once in a while as well. ?

Posted in Announcements, Tips & Tricks, Tutorials

Track Your Cryptocurrency Assets on Bitstamp, Bitfinex and Coinbase with Toshl

Tracking all your Bitcoin, Ethereum, Litecoin and other assets on cryptocurrency exchanges just got a whole lot easier. Toshl can now automatically connect to Bitstamp, Bitfinex and Coinbase exchanges. With these integrations, your crypto accounts can be automatically uploaded with latest balances, as well as individual transactions.


You’ll always see the crypto value side-by-side with the current value in your main currency, which is likely the one you’re most used to thinking in.

This applies both to the account balances as well as the prices of individual transactions. So there’s no need to search for “BTC to USD” conversions and manual calculations. You’ll see the exact price for all your assets right next to your account.


How to connect to the cryptocurrency exchange?

Setting up the connection to a cryptocurrency exchange is very similar to any other bank connection in Toshl. Go to the Bank connections section and click “New bank connection“.

You can then search for an individual exchange or click the country dropdown on the top right and select “Multiple countries”. All the crypto exchanges will be listed there.

Choosing crypto exchanges to connect to


Once you select the exchange you wish to connect, you’ll need to enter your credentials. With Coinbase, you’ll be redirected to their website where you can log in and confirm the connection.

With Bitstamp and Bitfinex, you will first need to create an API key on their respective websites. More detailed instructions on how to create the API key are available on the Toshl connection page. It’s a few extra clicks, but quite easy to do. The API key is there to enable the automatic connection without Toshl ever having to know your account password, which adds an extra layer of security.

Bitfinex log in

Once you’ve entered the required info, you can select how much data you want to import from the cryptocurrency exchange. You can get all the past data, data from a specific date onward or from now on. With Coinbase, you can select this after the credentials are verified.

Then just click Connect.

All done! Toshl will now download the data and show it in Toshl. Don’t forget you can set a filter to only see data from particular financial accounts or categories.


Tracking assets in crypto wallets

While tracking the assets in your crypto wallets is not available yet, you can also track them manually using a normal financial account in Toshl. Make a new manual financial account in Toshl, choose the currency the account will be denominated in and the current balance. You can then add transfers or incomes and expenses to that account.

If you often transfer money from your exchange accounts to your crypto wallet, Toshl can half-automate this for you. The transfer will likely be automatically detected on your exchange account and will just be missing info about the part of the transfer in your wallet. Go to Bank connnections, click on “Review entries” on your crypto exchange connection. There, you can confirm which incomes and expenses are really transfers and Toshl will offer to automatically fill in the manual portion of the transfer on your wallet account, so you can sort it all out in 2 clicks.


Currencies and exchange rates

The exchange rates for entries and balances on the connected accounts are fetched from the particular cryptocurrency exchange you’re using.

If you’re adding a cryptocurrency entry to a manual account that isn’t connected to an exchange, Toshl will suggest a middle rate for the currency. You can also enter a completely custom exchange rate, if you so prefer.

We’ve also added support and fresh exchange rates for 35 new crypto currencies. Together with the previous additions of currencies in February and July 2017 this brings the total count to 55.


Latest cryptocurrency additions

Rates for these are provided by Bitfinex.


Ethereum Classic (ETC)

Recovery Right Tokens (RRT)

Zcash (ZEC)

CST Core (BCC)

CST Unlimited (BCU)

Iota (IOTA)

EOS

Santiment (SAN)

OmiseGO (OMG)

Bitcoin cash (BCH)

NEO

ETP

Qtum (QTUM)

BG1 (BT1)

BG2 (BT2)

Aventus (AVT)

Eidoo (EDO)

BTG

Streamr (DATA)

QASH

AidCoin (AID)

Basic Attention Token (BAT)

aelf (ELF)

FunFair (FUN)

Decentraland (MNA)

Ethfinex Nectar Token (NEC)

RCN

Augur (REP)

iExec (RLC)

SingularDTV (SNG)

SpankChain (SPK)

Time New Bank (TNB)

TRON (TRX)

YOYOW (YYW)

0x (ZRX)


List of cryptocurrencies available in Toshl

February 2018, alphabetical, all currencies are updated with latest exchange rates


0x (ZRX)
aelf (ELF)
AidCoin (AID)
Augur (REP)
Aventus (AVT)
Basic Attention Token (BAT)
BG1 (BT1)
BG2 (BT2)
Bitcoin (BTC)
Bitcoin cash (BCH)
BitShares (BTS)
BTG
CST Core (BCC)
CST Unlimited (BCU)
Dash (DASH)
Decentraland (MNA)
DogeCoin (DOGE)
EarthCoin (EAC)
Eidoo (EDO)
Emercoin (EMC)
EOS
Ethereum (ETH)
Ethereum Classic (ETC)
Ethfinex Nectar Token (NEC)
ETP
Factom (FCT)
Feathercoin (FTC)
FunFair (FUN)
iExec (RLC)
Iota (IOTA)
LindenDollar
LiteCoin (LTC)
Monero (XMR)
Namecoin (NMC)
NEO
NovaCoin (NVC)
Nxt (NXT)
OmiseGO (OMG)
Peercoin (PPC)
Primecoin (XPM)
QASH
Qtum (QTUM)
RCN
Recovery Right Tokens (RRT)
Ripple (XRP)
Santiment (SAN)
SingularDTV (SNG)
SpankChain (SPK)
Stellar (STR)
Streamr (DATA)
Time New Bank (TNB)
TRON (TRX)
VertCoin (VTC)
YOYOW (YYW)
Zcash (ZEC)


Toshl Medici

The Toshl Medici subscription plan is required to automatically connect Toshl to financial institutions. Medici also enables automatic connections to banks in the Unites States, with more than 9000 connections available. We’re working on adding more bank and financial service connections worldwide.

Medici badge


Update 26. 2. 2018: Updated the post with 15 more currencies that were subsequently added.

Posted in Announcements, Personal finance, Tips & Tricks, Tutorials

Track Credit Cards on Toshl

Credit card spending can quickly get out of hand, so it’s good to keep track of how much you spend and when that credit card bill is due.
If your credit card or bank account is one of those supported for syncing in Toshl Medici (log in required), this can be done automatically and the expenses and balances will just fly in.
If you track you finances by adding your expenses to Toshl yourself, here’s how to best track your credit cards:

1. Add all your credit cards as separate financial accounts

More info on how to add accounts is available here.

2. Add your credit card spending during the month

Add expenses made with your credit cards on the day you pay for them. Just make sure that the credit card account is selected correctly.

3. As you spend, the credit card account balances will become negative

That’s how you’ll know how much the credit card bill will cost you when it comes. You can see these balances in the account list on the right.
In the mobile apps, swipe from the right to open the account list.
On the web app, click the accounts/filtering button on the top right of the screen.

4. When the credit card bill comes, make a transfer from your bank account

The transfer should be from the bank account from which you pay your credit card bill. The transfer destination account is the account of the credit card you’re paying off.
This transfer will cover the negative balance of the credit card account, so you can start the new month fresh.
If you don’t have any outstanding credit card debt and haven’t made purchases since the credit card billing period concluded, the account balance should be 0.


5. Set the transfer from your bank to your credit card to repeat automatically

Usually the transfer will repeat each month, on the day that you get the credit card bill.
For the transfer amount, you can set an approximate amount you expect for the credit card bill and then edit it to a more exact one when the bill comes.
Reminders will also be set by default when you make the transfer repeat automatically. One a day before the bill is due and one on the day. You can customize the reminder timing.
That way, you’ll be notified before and on the day when your credit card bill is due.
Once you have this set up, you can simply enter the exact amount on the transfer each month and the credit card balance will provide some much needed clarity.
To get warned about your spending tempo beforehand, consider setting up a budget. You can also set it to track just selected accounts, like your credit card.
Adding more than 2 financial accounts and automatically repeating entries require Toshl Pro. Automatic syncing with banks and credit cards is available with Toshl Medici.
Toshl monsters can be a bit old school. They still prefer cash briefcases to credit cards.
Posted in Android Tutorials, iOS Tutorials, Tutorials, Web App Tutorials

Financial Data Exports (Android)

Update April 2021: A much improved system for exports an email reports is available now. See the post Email Reports, File Exports and The Unbearable Lightness of Being Informed for more details.

With Toshl Finance you can export the data you entered into many different formats and services. This tutorial will show you how to do that, as well as use some nifty filtering options to export just the right information.

You can export the data that you entered into PDF, Excel (.xls), Comma Separated Values (.csv) or send the export directly to Google Drive – Spreadsheet app and Evernote.

The data sent to Google Spreadsheets will be in the same spreadsheet format as for Excel, so it will be immediately imported there and available for editing.

The export to Evernote goes in the PDF format and is therefore read only.

What to export?

First you need to decide which data you wish to export. By default, “All expenses and incomes” are selected, but you can narrow down the selection. While the list of choices can seem pretty long, it’s essentially a simple choice. Export expenses, incomes or both. You can narrow that down further, by exporting just certain categories or tags or everything other than certain categories or tags.

You can also filter the data by time span in accounts. Just as anywhere else in the app, tap the top right corner of the screen to display this type of filtering. You can set up any time span or combination of financial accounts.

Next, choose your preferred export format options. Keep in mind that they will arrive by email, as links to the export files that you can open in your web browser or an appropriate app.

All that’s left is to pick the email address where you want the exported data sent to. We suggest your account email by default, but you can add up to 10 different email addresses form your contact list.

Advanced filtering options on the web

If you prefer even nimbler filtering options for both incomes and expenses as well as filtering by locations, you can also export the data in the web app on toshl.com.
Capture

There you can also set up a monthly email report which will deliver your selected financial data exports to your email inbox at the end of the month.

Check out the web app version of this article for more on Financial Exports in the Web App.

Posted in Android Tutorials, Tutorials